ad

Showing posts with label wood. Show all posts

Sunday, February 12, 2017

DTH stand to cloth hanger - DIY woodworking India

DTH stand hack - How to convert it to cloth hanger


Hey everyone, welcome to DIY woodworking India. There are so many things you can build out of scraps! One of them for example, a DTH disk stand. I had an old one in my store room, thought why not give it a shape :-). The stand already had holes required for wall mount. Therefore, only things you have to do is - making holes/cuts to keep the hangers. 


I removed the disk from the whole DTH disk unit, keeping only the main stand. Then using an angle grinder, make cuts 2 inch apart. These will be the grips for the hanger. 


Add colour to it, I have chosen black. Below is the product deployed :).


Thanks for visiting DIY woodworking India. 

Saturday, February 11, 2017

How to build a guitar wall hanger - DIY woodworking India

How to build a guitar wall hanger - DIY woodworking India

Hi all! Welcome to DIY woodworking India. Hope you are doing well. Today I will share how I have built my guitar wall hanger. It will be made of iron, so welding on our way!

Materials:
1) U bracket
2) Iron rod of about 1/2 feet long
3) One quarter feet long 1 inch breath iron block - it will be used for wall mount.


We have to weld the U block to the iron rod first. For that, make a small groove in one end of the iron rod and file the U bracket in the middle such that they form a lock. Then weld them together.


Look at the joint carefully in the picture above. Lastly, weld the back with the hole to unit. Once welded, it looks like below.


Grind the edges and the entire unit so that there is no rust left. Now, it is time add some colour to it.

Almost done, but need to add rubber caps to the U unit, so that guitar can sit there smoothly without any scratch.

Thats it! Thanks for visiting woodworking India.


Thursday, February 9, 2017

How to use sketchup follow me (part - 2) - DIY woodworking India

How to use sketchup follow me (part - 2) - smooth a cylinder - DIY woodworking India


Welcome friends!
Lets explore the sketchup follow me feature more. We will see how a cylindrical shape can be made smooth at the edges using this feature. Sketchup made our life real easy! Watch the video to know how to do it.


I will post a series of videos so that you can understand more and more.

Thanks for visiting DIY woodworking India.


Wednesday, February 8, 2017

How I have made my bed table out of 1"x2/8" beading - DIY woodworking India

How I have made my bed table out of 1"x2/8" beading - DIY woodworking India


Welcome back friends! Everyone knows that a small bed table is probably one of the mostly used furniture now-a-days. When I operate my laptop in bed, I always keep it on it. Then take bed tea, reading a book etc etc. It is really useful! 

I have built one for us, out of 1" x 2/8'' wood beadings which I got from a wood mill. Price was INR 3/sqft. I had enough wood for INR 100, delighted! 

Here goes the plan.

Attach the beadings as shown in the picture by fevicol WRA or any suitable adhesive available for wood. In the edges, fix two beadings for holding it and for extra strength. You can use screws or fevicol for fixing these. Once done, keep them for drying so that joints become strong. 


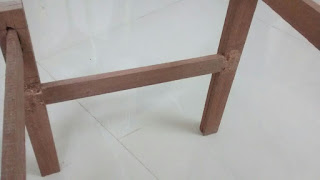
For the legs, fix two pieces of 1 feet with adhesive. Once dried, make groove of 1''x1/4'' as shown above. Make another 3 units similarly. 


Join 2 legs as shown above 1.5 ft apart. Join other pair as well.


Just forgot to add, make another grove in the leg as shown in the picture. Repeat the same for all the four legs. 


 Now fix the side beadings as shown below. Repeat the same for the other pair of legs.


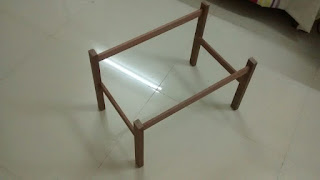
Once all the parts are assembled, it looks like below.


Now join the leg part and the top part by L bracket as shown below.


This is how I have built the table. Comment if you have any doubt. 

Thanks for visiting DIY woodworking India. I will post the pictures of the real table.


Just found the old photographs of the table. Hence posting the same.

DIY bed table plan, diy bed table project, diy bed table, how to build a bed table, how to build bed table, diy bed table idea
Building the frame of DIY small bed table

DIY bed table plan, diy bed table project, diy bed table, how to build a bed table, how to build bed table, diy bed table idea
Building the frame of DIY small bed table

DIY bed table plan, diy bed table project, diy bed table, how to build a bed table, how to build bed table, diy bed table idea
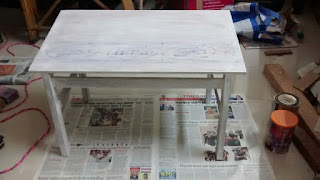
Adding a layer of primer on the DIY bed table

DIY bed table plan, diy bed table project, diy bed table, how to build a bed table, how to build bed table, diy bed table idea
Added colour to the DIY bed table

DIY bed table plan, diy bed table project, diy bed table, how to build a bed table, how to build bed table, diy bed table idea
Added colour to the DIY bed table

DIY bed table plan, diy bed table project, diy bed table, how to build a bed table, how to build bed table, diy bed table idea
DIY bed table in production

Tuesday, February 7, 2017

How to build a kitchen container rack - DIY woodworking India

How to build a kitchen container rack - DIY woodworking India

Welcome to DIY woodworking India. There were messes in the kitchen with the containers all around, why didn't I make a rack for keeping those? Absolutely! The plan was already in my mind. Without much ado, lets start our work.

All you will need are listed below:

4''x1/2'' ply 18'' - 2 pieces - main carcass, side frame.
2''x1/2'' ply 18'' - 4 pieces - main carcass, top frame, bottom frame, back frame.
2"x3/8'' ply 12'' - 4 pieces - for 4 shelves.
L support 1'x1' - 20 pieces for holding the shelves.
15' wood beading of about 20 mm wide of your choice.
Laminate of your choice.


I hope the pictures are clear. In case there is any doubt, please comment or message me. Below are the pictures while building it and finally the rack in action.


Thanks for visiting DIY woodworking India, hope you have liked the rack :). Happy DIY woodworking. 

Monday, February 6, 2017

Sketchup follow me feature - DIY woodworking India

Sketchup follow me feature - DIY woodworking India


Hi friends, welcome! Let's do some hands-on on sketchup tool. There is a very useful feature in sketchup called follow-me. It allows a pattern to follow another pattern. For example, a circle following a line. Watch this video.


Thanks. Hope it was useful to you.

Thanks for visiting DIY woodworking India. 

How to build a wall mount diya stand - DIY woodworking India

How to build a wall mount diya stand - DIY woodworking India


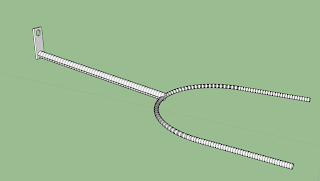
Hi friends, welcome to DIY woodworking India. Have you seen diya stands which can be hung from wall? I am going to build one myself. It will not be a wooden one, but an iron one. So, lets gear up for some welding stuff!

The design of the wall mounted diya stand.


You will need a iron rod piece which will be bent as per the design. I have used a threaded iron rod which I already had it with me for a long time. An iron plate like piece is also needed for the base. For wall mount, cut a round wooden piece. It will be fitted on the wall.


It is all about how well you can do weld the iron rod to the base plate. I will give you few welding tips here for sure! The reason for using iron rod and iron base plate is because it can withstand the heat from diya and there is no danger of any fire. Or, if you are not comfortable with welding, you can tie them by screws. Comment if you have any query, below are the pictures of the final product. it  is slightly different in look but concept is the same.


Hope you like it! Thanks for visiting DIY woodworking India.

Thanks.

Kitchen Cabinet Making (part 2) - DIY woodworking India

Welcome to DIY woodworking India.

We were building the kitchen cabinet (please refer to the first part - Kitchen Cabinet Making (part 1) - DIY woodworking India). Lets finish it by hanging it to walls and then fix the door.


Before hanging it to the wall, lets check the door fittings. You will need minimum 4 pairs of blum hinges - 2 full close, 2 half close. Difference between half close and full close is, in the former, when the door is closed, the side edge of the carcass is visible and in the latter, it is not visible. We need 2 half close because I want it to fix in the corner and we will use it for the right side door in picture above. The left door is fitted using full close as the side edge of the cabinet carcass is not visible.


For cabinets which are wall mounted, we should use block plywoods. The reason being they are light weighted. Once you cut the pieces to the measurements as per your cabinet - 2 pieces here, its time to fit the hinges.

Blum hinges that we will use have 2 parts - cup part and the base part. Cup part fits into the door and base parts in the carcass. To fit the cup part, it is required to make a hole of about 1'' diameter(check your hinge to be precise) half inch deep into the door as shown in the picture above. Screw the cup part in the door. Screws are included in the hinge package. Fit the base part to the cup part and fit it to the main cabinet. Do not screw them immediately. Once you figure out the suitable position to be fit, mark it, and remove the base part of the hinge. Now screw the same to the main cabinet body. Refer to the diagram. Once you screw all the cups and base parts of the hinges properly, its time to remove the doors from the cabinet as we have to first wall mount them.

DIY woodworking India will post a video how to do it soon. We can adjust few things in these hinges. I will show them all in the upcoming video here.


DIY woodworking India - wall hanging the cabinet


Make 2 holes with your driller for wall mount the cabinet. Diameter of the hole should be equal or little more than the diameter of the mounting screws. We will be using 3 inches long wall mount screws(available in local hardware store). Keep them ready. Once done, mark the 2 holes to be made in the wall. For paper marking and mounting, lift the cabinet and keep it at the position you want to hang in the wall, keep a spirit level on the top so that you know it is levelled. Once you position it correctly, mark the holes in the wall by a pencil or any other marker aligned with the mounting holes you have made in the cabinet. Drill the hols in the wall. Put wooden/plastic guttas into the holes and hammer them well. Once done, lift your cabinet, position it so that cabinet holes and wall holes align and then insert the wall mount screws to fit it to the wall. Done! I will add a video here too. 

Thanks for visiting DIY woodworking India. 


Sunday, February 5, 2017

Workshop makeover - DIY woodworking India

Workshop makeover - DIY woodworking India

DIY Woodworking India on android
Hi everyone, welcome to DIY woodworking India. Without any delay, lets start building a  few storage units for the woodworking workshop. Tools are lying here and there, sometimes, I can't even locate my own tool! Therefore, I have thought about building 2 wall mount cabinets. Lets get into hands on.

I have a piece of abour 2.5'(feet) x 4' plywood of 18 mm thickness and a few smaller pieces of same thickness. Here goes the plan:

Figure 1

4'x1'x1' - the cabinet dimension.

Pieces:
4'x1' - 2 pieces
4'x.5' - 1 piece
1'x1' - 2 pieces

I have used circular saw to cut these pieces. Here is a video which you can refer how to cut wood pieces straight using circular saw.


Once done, join them as shown in figure 1. Use 2 inches screws so that cabinet gets a good fit. After I hang it on the wall,


I have built one smaller cabinet as well. Here are the pictures. 


Hope you like it. Please write to DIY woodworking India for more details. 

Thanks for visiting us,
Sarang

Saturday, February 4, 2017

Kitchen Cabinet Making (part 1) - DIY woodworking India

Kitchen Cabinet Making - DIY woodworking India


Hi friends, welcome to DIY woodworking India. Hope you have a wonderful weekend. Today I am going to talk about how to make kitchen cabinets by yourself. Don't get scared, you can do it! When I started to think about it, I too got little hesitated as I was not sure how the outcome would be in terms of the final product. But trust me, it is not that tough at all. First thing as I always say, get your plan right. Lets take the one at the corner in the photo below. The beading is yet to be fixed. In kitchen, generally water proof grade 18mm plywoods are used. I have used the same here.


To build this kind of cabinet, first build the main carcass. Here goes the plan. If you find it difficult to understand, please drop me a message and I will be glad to help you.


I have shown you how to join the pieces for only one corner of the cabinet carcass. You have to repeat it for all the corners and the basic carcass will be ready.

36'' (inch) x 12'' - 2 pieces (for the height)
24''x12 - 2 pieces (top and bottom)
16''x12 - 2 pieces (back side support and for wall hanging)

Use good quality screws so that joints are reliable. I have used "pentagon" drywall 2'' screws. Stay tuned for the slabs and how to hang it to the wall from DIY woodworking India. 

Thanks,
Sarang


Thursday, February 2, 2017

Woodworking tools - DIY woodworking India

Hand tools and power tools

Hi everyone! Thanks for coming back & welcome to DIY woodworking India once again. I will discuss about necessary tools to have for woodworking in a comfortable way. Though working with hand tools at the beginning is a good idea, it is always better to to know how to operate woodworking power tools. There are a lot of power tools available in the market, both online and local hardware shops now-a-days and you should be able to choose the right ones necessary to get the job done. DIY woodworking India will guide you to choose ones necessary for you.

Basic hand tools:


Hammer
Chisel
hand Saw
File(rasps)
Screw driver
Plier
Try square
G clamp
Measure Tape
Sandpaper


Power tools:


Circular saw
Jig saw
Drill kit
Router

Personal experience shared by DIY woodworking India

Now, I will discuss about choosing the right power tools among the available ones. I will suggest you the smartest deal where price is reasonable without compromising with the quality.

Circular saw - Always go for a good brand. They are more reliable. I will suggest Black & Decker 7 inch 1500 Watt. I have been using it for close to 3 years now and never faced an issue. It has a solid make. It can be tilted to have angular cut as well. So, cutting 45 degree angle is not a problem. It comes with necessary spanners(2 numbers) to remove/fitting/tilting blade. It has all safety measures. I personally like the bosch/skil products as well but the local hardware shop guy told me that their after sale service of is poor. But as we will not be using the power tools heavily all day long, the chances of malfunction/periodic maintenance of the product is less and hence you can opt for these products as well.

There is another choice for you i.e.; 4 inch 1200 watt marble cutter(bosch). As it is smaller in size and lighter, it may be more comfortable for you. Decide what type of wood you will be dealing with. If the wood you will be cutting is more than 2 inch in thickness, then go for 7 inch circular saw, otherwise, 4 inch is fine.


Jig saw - The reason for having jig saw is when you have to cut in a curve line for example a circle. As I said earlier, go for the branded one. Go for black and decker 450 watt product. I have this product and no complain so far. The package comes with a blade. You can buy blades of different thickness. This tool is very simple to operate. You can compare it with a sewing machine.


Drill kit - DIY woodworking India suggests Bosch GSB 10 RE. It is a complete package! This kit comes with drill machine, HSS, wood, metal drill bits, hammer, plier, measuring tape, spirit level, screw driver bits, spanner bits  etc. I would suggest even if you do not want to do it woodworking, keep this kit at your home because it is so much useful in day to day maintenance work - such as drilling a hole in wall for wall mounting, hammering a nail, measuring your dining table length, unscrew a tightened screw etc. I have this product and there is no problem with this kit.


Router - It is used to hollow out a part from the wood face. For dado cut, round over and beading router is extensively used now a days. I have the black and decker plunge router 2400 watt. It is heavy duty and bulky and initially, I faced lot of difficulty in operating it. But, after a couple of days of using, you will get used to it.


Online links to buy - suggested by DIY woodworking India 


Links will follow soon.

Thanks,
Sarang

How I have built my shoe rack - DIY woodworking India

DIY woodworking India - shoe rack

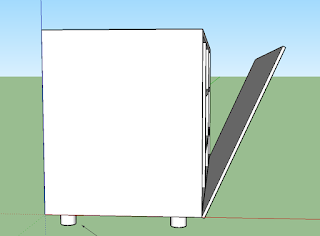
Welcome to my blog DIY woodworking India. Hope you are doing well. Today I will guide you to build a simple wooden shoe rack. There are plenty of designs available in internet, but having one of your own and then building on it, will be of great joy. Take a look at my plan.


The height of the cabinet is around 18 inch, one can comfortably sit on it and tie his shoes. Length and breadth of the cabinet is around 36 inch and 12 inch respectively. Door is connected by hinges from the front bottom side. Use cabinet legs - wooden or steel, both are fine. The rack is divided into smaller storage rooms inside. The reason for keeping a bigger room in the left side is to have space for bigger/longer shoes!


The actual pictures of the shoe rack along with the guide video will be available soon. DIY woodworking India will provide you all kinds of support to make you comfortable with woodworking by self.


Thanks for visiting DIY woodworking India. 


Thanking you again,
Sarang

ad